
Introduction
The beauty world has seen a remarkable resurgence of French nail art, evolving from its classic beginnings to become a canvas for creativity and personal expression. What was once a simple design is now a versatile style that can be adapted to reflect current trends and individual tastes. DIY nail art has emerged as a fun and engaging outlet for those looking to explore their artistic side while also enjoying a moment of self-care. With spring upon us, it’s the perfect time to embrace vibrant colors and floral motifs that capture the essence of the season.
Spring is synonymous with renewal and blossoming flowers, making it an inspiring backdrop for nail art. Imagine your fingertips adorned with pastel hues and delicate floral designs, celebrating the beauty around you. Whether you’re a seasoned nail artist or just starting, these DIY French nail art designs will encourage you to tap into your creativity and personalize your nail aesthetic. So grab your nail supplies, let your imagination run wild, and prepare to bring a splash of spring to your fingertips!
“Creating a cozy reading nook is all about maximizing comfort in a small space. It’s about intentional design that serves both function and feeling.”
– Interior Design Magazine
Materials You’ll Need for DIY Nail Art
Before diving into the world of DIY nail art, it’s essential to gather the right materials. Here’s a list of essential tools you’ll need for creating stunning spring-inspired French nail designs:
| Essential Tools | Description | Recommended Brands |
|---|---|---|
| Nail Polish | Choose a base color and a selection of spring pastels. | OPI, Essie, Sally Hansen |
| Nail Brushes | Fine-tipped brushes for detailed designs and lines. | Nicole Diary, born pretty |
| Dotting Tools | Perfect for creating floral designs and patterns. | JESSICA, Manicure |
| Nail Tape | Helps achieve clean lines for geometric designs. | Modelones, TOMICCA |
In addition to these essentials, consider incorporating optional materials like rhinestones, stickers, and nail art pens to elevate your designs. Brands such as Zoya and Kiss offer excellent nail art stickers that can bring your spring themes to life with minimal effort. Don’t forget to prioritize nail care products, including base and top coats, to ensure your nails remain healthy and your designs last longer. Proper nail care will not only enhance the appearance of your nail art but also promote nail health.
Classic Spring French Tips with a Twist
The traditional French tip technique is a classic that never goes out of style. It involves painting the tips of your nails with a contrasting color to the base, creating a clean and polished look. This spring, try swapping the iconic white tips for soft pastel shades such as mint green, lavender, or pale pink to embrace the season’s vibrancy.
For a modern twist, consider experimenting with ombre effects. Instead of a stark line, blend your base color into the tip for a softer transition. Here’s a step-by-step guide to achieving this look:
1. Prep Your Nails: Start by cleaning and buffing your nails to create a smooth surface. Apply a base coat to protect your natural nails.
2. Choose Your Colors: Select a base color for your nails and a pastel shade for the tips. For example, a nude base with pale blue tips creates a fresh spring look.
3. Apply the Base Color: Paint your nails with the base color and allow it to dry completely.
4. Create the Tips: Use a thin brush or nail tape to mark off the area for your tips. Apply the pastel color to the tips, ensuring even coverage.
5. Ombre Effect (optional): If you want to create an ombre effect, use a makeup sponge to dab the pastel color onto the tips, gradually blending it into the base color.
6. Finish Up: Allow the design to dry, then apply a top coat for added shine and protection.
By following these steps, you can craft classic French tips with a delightful spring twist that showcases your personality and creativity.
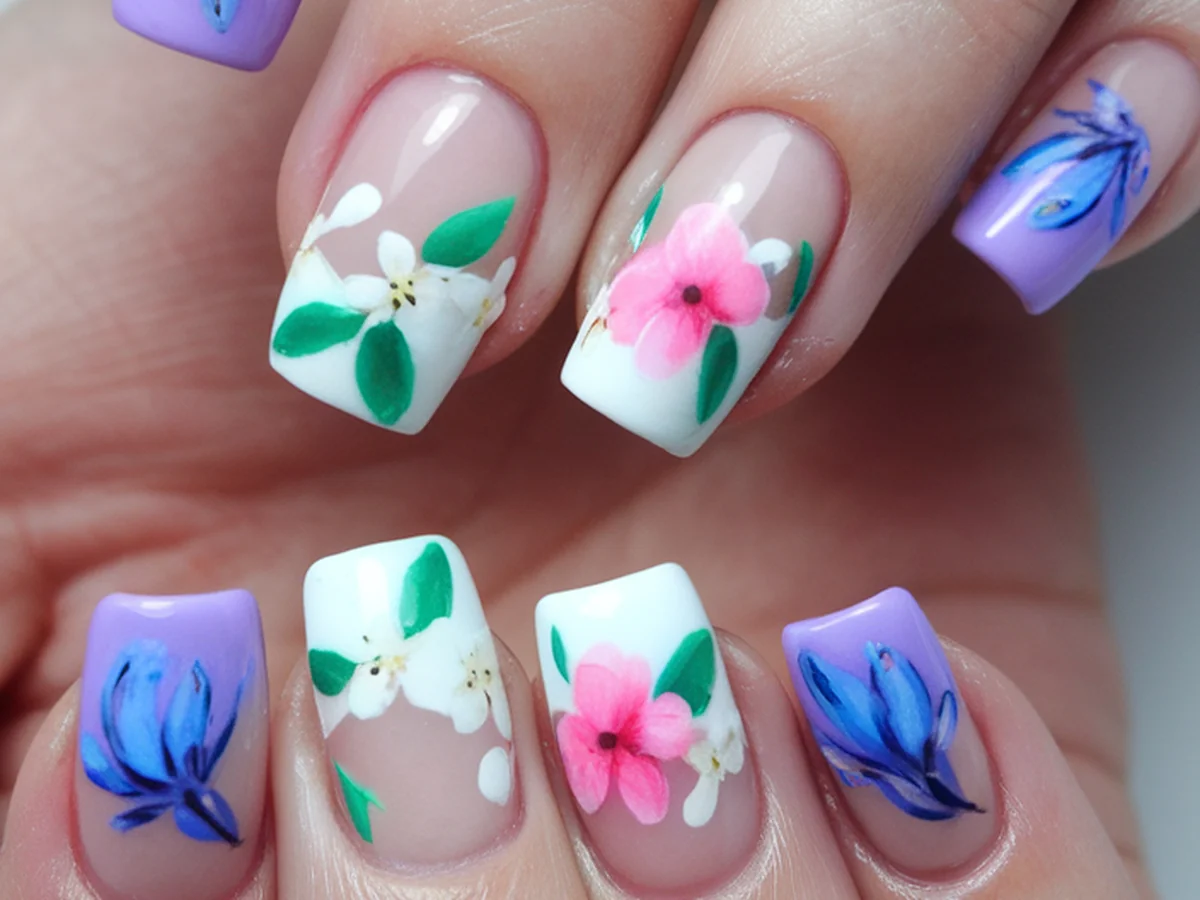
Floral Accents: Adding Bloom to Your Tips
Floral designs are perhaps the most quintessential of spring motifs, and they can beautifully complement your French tips. Popular flowers like daisies, tulips, and cherry blossoms can serve as inspiration for your nail art. Adding simple floral accents can transform your manicure into a blossoming masterpiece.
Creating floral designs is easier than you might think, especially with a dotting tool. Here’s how you can bring flowers to your tips:
1. Choose Your Flowers: Decide on the types of flowers you want to create. Daisies are great for beginners due to their simple shape.
2. Prepare Your Base: Start with your French tips as described earlier, allowing them to dry completely.
3. Create the Flowers: Using a dotting tool, dip it into your chosen polish color (white for daisies, for example) and gently create small dots on your nail to form petals. Aim for five dots in a circular shape for each flower.
4. Add Centers: Use a contrasting color to create the centers of the flowers by dotting a smaller dot in the middle of each petal.
5. Negative Space: Consider leaving some negative space around the flowers to give a modern twist to your design. This technique allows the beauty of your nail’s natural color to shine through.
6. Seal Your Design: Finish with a top coat to seal your floral art and add a glossy finish.
With these simple steps, you can easily infuse your French tips with floral accents that celebrate the beauty of spring. The combination of colors and the whimsical charm of flowers will make your nails stand out and reflect the season’s spirit.
Geometric Patterns: A Modern Spring Flair
If you’re looking for a more contemporary take on spring nail art, geometric designs are a fantastic way to add a modern flair to your French tips. These patterns can range from simple lines to more complex shapes, allowing you to express your creativity in unique ways.
To achieve clean and crisp geometric designs, you’ll want to use nail tape. Here’s a guide to get you started:
1. Select Your Palette: Choose a few spring colors that complement each other. For instance, a combination of pale yellow, soft lavender, and mint green can create a refreshing look.
2. Create Your Base: Start with your French tips, allowing them to dry completely.
3. Tape Off Sections: Once dry, use nail tape to create geometric shapes on your nails. You can create triangles, stripes, or even chevrons.
4. Apply Color: Paint over the taped-off sections with your chosen colors. Be bold and experiment with color blocking to make a statement.
5. Remove Tape: Carefully peel off the tape while the polish is still wet to reveal clean lines.
6. Layering Techniques: For added depth, consider layering different patterns and colors. You can add a second layer of tape to create additional shapes on top of your first design.
7. Finish with Top Coat: Seal everything in with a top coat to add shine and ensure your design lasts.
With geometric patterns, you can play around with shapes and colors to create a truly customized look that showcases your unique style while embracing the vibrant spirit of spring.
Pastel Gradients: Soft and Subtle Transitions
Gradient nail art is a beautiful technique that works wonderfully for spring, allowing for soft transitions between colors and a delicate aesthetic. With pastel shades, you can create a seamless blend that evokes the gentle hues of spring blossoms.
Here’s how to achieve a lovely pastel gradient on your nails:
1. Choose Your Colors: Select three to four pastel shades that complement each other, such as light pink, baby blue, mint green, and soft yellow.
2. Prepare Your Base: Start with a base coat and apply a solid base color on your nails. This could be a light shade that matches your gradient theme.
3. Sponge Application: Use a makeup sponge to apply the gradient effect. Apply stripes of your chosen colors onto the sponge, overlapping them slightly for a seamless blend.
4. Dab the Sponge: Gently dab the sponge onto your nails, starting from the base and moving towards the tip. Repeat this process until you achieve the desired gradient intensity.
5. Clean Up: Use a small brush dipped in nail polish remover to clean up any excess polish around your cuticles.
6. Top Coat: Finish your gradient with a top coat to add shine and protect your design.
Pastel gradients offer a soft, dreamy look that embodies the essence of spring. They are versatile enough to be worn on their own or combined with other designs, such as floral or geometric patterns, for a multi-dimensional effect.
Creative Nail Art with Stickers and Stencils
If you’re looking for an easy and effective way to create intricate designs without the need for advanced skills, nail stickers and stencils are your best friends. They can add a pop of personality to your French tips while saving you time and effort.
Here’s how you can use stickers and stencils to enhance your spring nail art:
1. Select Your Designs: Choose spring-themed stickers or stencils, such as butterflies, flowers, or geometric shapes. Many brands, like Nail Art Boutique and Kiss, offer a wide variety.
2. Prepare Your Nails: Start with your French tips. Make sure they are completely dry before applying stickers or stencils.
3. Applying Stickers: Simply peel off the sticker and place it on your nail in the desired position. You can mix and match different designs for a playful look.
4. Using Stencils: If you’re using stencils, place them on your nail and apply polish over the stencil. Carefully remove the stencil to reveal a clean design underneath.
5. Placement Techniques: Experiment with placement by arranging stickers in clusters or along the tips of your nails for added flair.
6. Seal Your Design: Apply a top coat to ensure the longevity of your stickers and stencils, and to give your nails a polished finish.
Utilizing stickers and stencils allows you to create beautiful spring-themed nail art with minimal effort. It’s a great way to experiment with designs if you’re new to nail art or simply want to create stunning looks quickly.
Adding Glamour: Rhinestones and Glitter
If you want to take your spring nail art to the next level, consider incorporating rhinestones and glitter. These embellishments can add a touch of elegance and sparkle, perfect for special occasions or just to feel glamorous.
Here’s how to effectively use rhinestones and glitter in your designs:
1. Select Your Embellishments: Choose rhinestones in various sizes and colors that complement your nail art. Glitter polish is also an excellent option for adding sparkle.
2. Apply Base Colors: Start with your French tips or any other base design. Ensure it’s fully dry before moving on to the embellishments.
3. Positioning Rhinestones: Use a dot of clear polish or nail glue to place rhinestones on your nails. Consider placing them at the base of your tips or scattered across your nail for a more dynamic look.
4. Applying Glitter: If using glitter polish, apply it to the tips or along the cuticles for a sparkling effect. You can also use a loose glitter by dabbing it onto wet polish for a more dramatic look.
5. Avoid Overdoing It: While it’s tempting to load on the sparkle, remember to keep your design balanced. Choose a few key areas to highlight for a sophisticated touch.
6. Seal for Longevity: Finish with a top coat to secure the rhinestones and glitter, ensuring your design stays intact and shiny.
Incorporating rhinestones and glitter into your spring nail designs can elevate your look and make your manicure a showstopper. With the right application, these elements can transform a simple design into something truly special.
Nail Care Tips for Beautiful DIY Designs
Creating stunning nail art is only part of the equation; maintaining healthy nails is crucial for achieving the best results. Healthy nails not only look good but also provide a solid foundation for your designs. Here are some essential nail care tips to ensure your DIY creations shine:
1. Prep Your Nails: Start by cleaning your nails thoroughly to remove any oils or residues. Buff your nails gently to create a smooth surface for polish application.
2. Use a Base Coat: Always apply a base coat before your nail polish. This not only protects your nails from staining but also helps polish adhere better, leading to longer-lasting designs.
3. Moisturize: Keep your cuticles and nails moisturized with cuticle oil or hand cream. This helps prevent dryness and breakage, ensuring your nails remain healthy.
4. Aftercare Routine: After completing your nail art, consider applying a nourishing treatment to your nails. This can help repair any damage and promote healthy growth.
5. Top Coat Importance: Never skip the top coat! It adds a protective layer to your art, preventing chipping and enhancing shine.
By following these nail care tips, you can ensure that your DIY designs not only look fabulous but also last longer and keep your nails healthy for ongoing creativity.
Conclusion
The joy of DIY spring French nail art lies in its ability to blend creativity with self-expression. With a few simple techniques and materials, you can transform your nails into beautiful works of art that reflect the vibrant spirit of the season. Whether you opt for classic French tips, floral accents, or modern geometric patterns, the possibilities are endless.
We encourage you to experiment with these designs and make them your own. Share your creations with friends and family, or connect with fellow nail art enthusiasts online. We’d love to hear your feedback and any suggestions for future nail art topics you’d like to explore.
Remember, nail art is more than just a trend; it’s a personal expression of your unique style and creativity. So, grab your nail supplies, unleash your imagination, and let your nails bloom this spring!
Frequently Asked Questions
What are the best pastel colors for spring nail art?
Pastel colors are perfect for spring nail art as they evoke the freshness of the season. Some of the best pastel shades include soft pinks, gentle lavenders, mint greens, baby blues, and creamy yellows. These colors not only complement each other well, but they also provide a light, airy aesthetic that pairs beautifully with floral and geometric designs. When selecting pastel shades, consider your skin tone to find colors that enhance your natural beauty.
How can I make my nail art last longer?
To ensure your nail art lasts longer, start by applying a good base coat to protect your nails and help polish adhere better. After completing your design, always finish with a high-quality top coat, which adds a protective layer against chips and scratches. Additionally, avoid exposing your nails to excessive water or harsh chemicals, and consider using gloves while cleaning or doing dishes. Regularly moisturizing your nails and cuticles will also help maintain their health and appearance.
Can I use regular craft supplies for nail art?
While some craft supplies can be used for nail art, it’s essential to choose materials that are safe for use on nails. Regular craft paints may not be suitable and can lead to nail damage or irritation. Instead, opt for nail-specific products, such as nail polishes, stickers, and embellishments designed for use on nails. Nail art supplies are formulated to be safe and to adhere properly, ensuring a beautiful and lasting finish.
What is the best way to remove nail art?
To remove nail art effectively, start by soaking a cotton ball in acetone or a non-acetone nail polish remover. Place the soaked cotton ball on your nail and wrap it in aluminum foil to allow the remover to penetrate the polish. After about 10-15 minutes, gently wipe away the polish. If there are stubborn areas, use a gentle scraping tool or an orange stick. Always follow up with a nourishing cuticle oil to keep your nails healthy after removal.
Is it necessary to use a base coat and top coat?
Yes, using both a base coat and a top coat is highly recommended for any nail art. A base coat protects your nails from staining and helps the polish adhere better, which can lead to longer-lasting designs. A top coat provides a protective barrier against chips and scratches while adding a glossy finish that enhances the overall look of your nail art. Skipping either step can result in a less durable and less appealing manicure.