
Introduction
As the days grow longer and the flowers begin to bloom, the world transforms into a canvas of vibrant colors and refreshing scents. This seasonal shift provides the perfect backdrop for expressing creativity through nail art. Spring is not just a time for rejuvenation in nature; it’s an opportunity for you to breathe new life into your personal style. Nail art, with its playful designs and seasonal themes, allows you to celebrate the essence of spring right at your fingertips. In this article, we will explore a variety of fun and easy nail art designs that you can try at home, ensuring your nails reflect the joyous spirit of the season.
“Creating a cozy reading nook is all about maximizing comfort in a small space. It’s about intentional design that serves both function and feeling.”
– Interior Design Magazine
The Allure of Spring-Inspired Nail Art
Spring is synonymous with renewal, and this is beautifully reflected in the colors and themes that inspire spring nail art. As winter fades, we see a shift from deep, heavy hues to light, airy pastels and vibrant florals. The palette of spring often features shades such as soft pinks, mint greens, sunny yellows, and delicate lilacs, all of which evoke a sense of freshness and optimism.
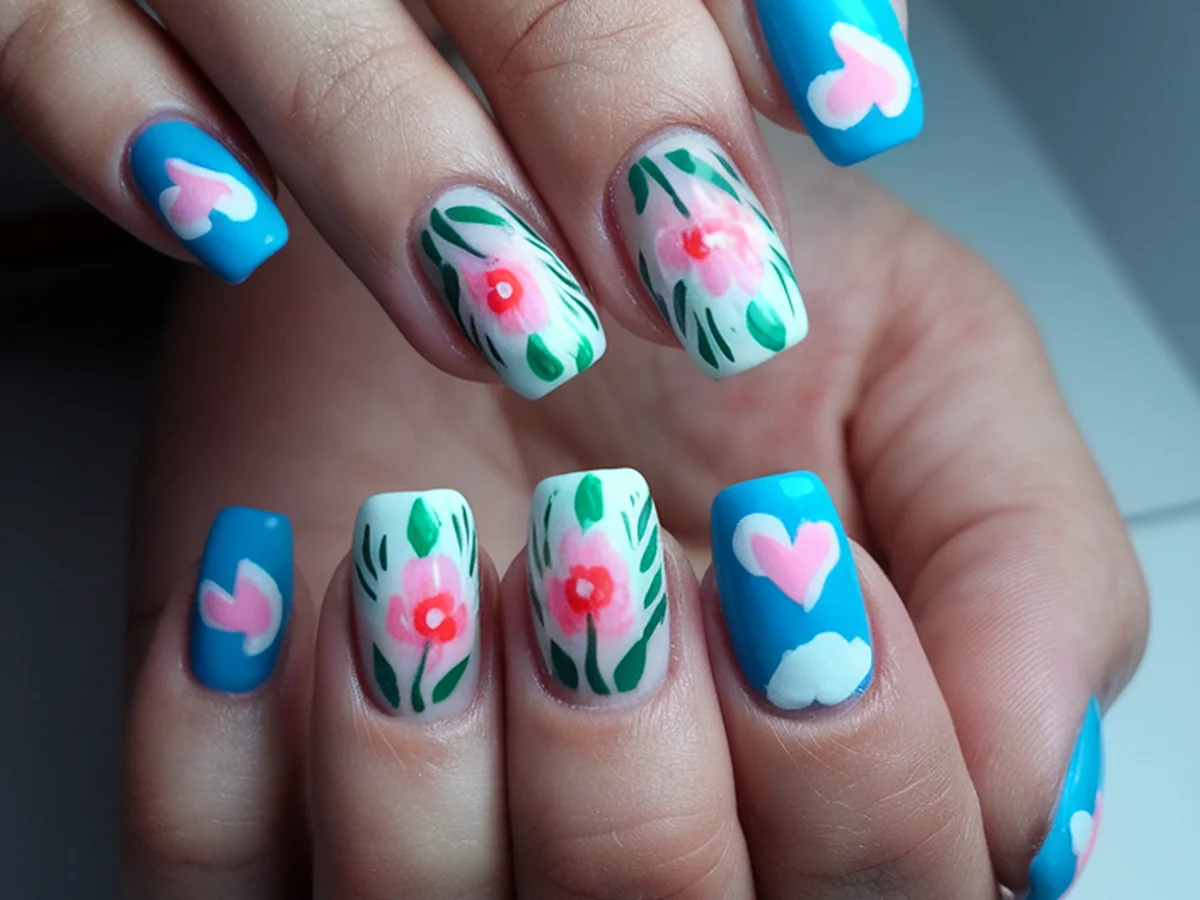
Popular spring motifs include flowers, butterflies, and nature-inspired elements, which capture the essence of life awakening after the cold months. Floral designs, in particular, remain a favorite, as they symbolize growth and beauty. Nail art becomes a powerful medium for expressing your personal style and mood, allowing you to wear your creativity on your fingertips. Whether you opt for a subtle design or a statement piece, your nails can reflect the joy and vibrancy of the season.
Essential Tools and Materials for Nail Art
Before you dive into the world of spring nail art, it’s essential to gather the right tools and materials. Here’s a brief overview of the basic supplies you’ll need:
| Tool | Purpose | Recommendations |
|---|---|---|
| Nail Polish | Base color and design colors | Choose spring-inspired shades |
| Nail Brushes | For detailed designs | Look for fine-tipped brushes |
| Dotting Tools | For creating dots and patterns | Available in various sizes |
When it comes to color selection, opt for pastel shades, which are perfect for spring. Consider hues like baby blue, soft pink, lavender, and mint green. Additionally, a good basecoat is crucial for protecting your nails, while a quality topcoat will enhance shine and ensure your designs last longer.
Floral Patterns: Bring Spring Blooms to Your Nails
One of the most delightful aspects of spring nail art is the opportunity to incorporate floral patterns. You don’t need to be a professional to create beautiful flower designs; simple techniques can yield stunning results. Start with a base color of your choice, and once dry, use a dotting tool to create small dots that will form the petals of your flowers.
For a basic flower, place five dots in a circular pattern, then add a tiny dot in the center for the stamen. Experiment with colors—pair pastel pink petals with a bright yellow center for a cheerful look. If you’re feeling adventurous, consider adding 3D floral effects using nail stickers or acrylics, which can elevate your design to the next level.
Color combinations play a significant role in making floral designs pop. Think about pairing complementary colors or using a gradient effect for a more dynamic look. Pastel shades of green can serve as a lovely backdrop for brighter floral designs, creating a beautiful contrast that captures the essence of spring.
Pastel Ombre Nails: A Subtle Gradient
Pastel ombre nails are a trendy and sophisticated way to embrace spring. This technique involves blending two or more colors to create a soft gradient effect that is both eye-catching and elegant. To achieve this look, start by applying a base coat and allowing it to dry completely. Choose two or three complementary pastel shades—such as lavender, mint, and peach.
Using a makeup sponge, apply a stripe of each color, then gently dab it onto your nails, starting from the tips and working towards the base. The sponge will help to blend the colors seamlessly, creating a professional-looking ombre effect.
For an even polished appearance, consider sealing your design with a topcoat. Variations of this technique can involve different patterns, such as diagonal or vertical ombres, allowing you to create a unique look that suits your personal style.
Geometric Designs: Modern Spring Vibes
Geometric designs offer a modern twist to your spring nail art repertoire. These patterns can range from simple lines to complex shapes, making them versatile for both casual and formal occasions. To create geometric nail art, you’ll need some tape to achieve clean lines and shapes.
Begin by painting your nails with a base color. Once dry, use tape to create various shapes—triangles, stripes, or squares—on your nails. Apply a contrasting color over the exposed areas, then carefully peel away the tape to reveal the design underneath. This technique ensures sharp, precise lines that give your nails a polished look.
When it comes to color combinations, consider using a mix of pastels and bold colors. For example, a soft lavender base with white and gold geometric patterns can create a stunning visual effect, embodying the freshness of spring while also making a statement.
Polka Dots and Stripes: Fun and Playful Patterns
If you’re looking for quick and playful nail art ideas, polka dots and stripes are your best friends. These patterns are easy to create and can be customized to fit your mood or outfit. For polka dots, use a dotting tool or the end of a bobby pin to make evenly spaced dots on your nails.
Choose a base color, such as a light pastel, and then add contrasting dots in colors like white or bright pink. For stripes, apply tape to create straight lines, then paint over with your desired color. When you remove the tape, you’ll have neat, crisp stripes that add a fun touch to your nails.
You can also mix and match polka dots with stripes for a cohesive look. For instance, try a polka-dotted accent nail paired with striped nails to create a playful nail art design that captures the spirit of spring.
Nature-Inspired Nail Art: Leaves and Trees
Embrace the beauty of nature this spring by incorporating leaves and tree designs into your nail art. These designs can reflect the lush greenery that emerges during the season and can be achieved with simple brush techniques. Begin with a neutral base color, such as a soft beige or pale green, that will allow your designs to stand out.
To create leaves, use a thin nail brush to paint simple leaf shapes in varying shades of green. You can also create branches by using a slightly darker color and a fine brush. Another technique involves using a sponge to dab on green shades, creating a textured effect that resembles foliage.
When selecting colors, consider earthy tones that reflect the natural world. Soft browns, muted greens, and hints of floral colors will evoke a sense of being surrounded by nature. These designs not only celebrate the season but also connect you to the beauty of the outdoors.
Nail Art for Special Occasions: Spring Events
Spring is a season filled with special occasions, from weddings to garden parties and holidays. Nail art can be a wonderful way to complement your outfits for these events. For weddings, consider delicate designs featuring soft florals or subtle glitter accents that add a touch of elegance to your look.
If you’re attending a festive event, don’t shy away from bolder colors and designs, such as bright florals or intricate patterns. You can also personalize your nail art by adding embellishments like rhinestones or glitter for a glamorous touch.
For quick fixes, consider using nail wraps or decals that can be easily applied over your base color, allowing you to achieve a sophisticated look without the hassle of intricate designs. Always remember to seal your designs with a topcoat to ensure they last throughout the festivities.
Conclusion
Spring nail art is a joyful way to embrace the season’s beauty and express your creativity. With an array of designs, from floral patterns to geometric shapes, there’s something for everyone to enjoy. Experimenting with colors, techniques, and personal touches allows you to create unique designs that reflect your individual style.
So go ahead, grab your nail polish and tools, and let your imagination run wild! Share your creations with friends or on social media, and join a community of nail art enthusiasts who celebrate the beauty of self-expression through this delightful art form.
Frequently Asked Questions
What are the best colors for spring nail art?
Spring nail art typically features soft pastels and vibrant colors that reflect the blooming flowers and fresh greenery of the season. Consider shades like baby pink, mint green, lavender, and soft yellow as your go-to colors. These hues not only embody the essence of spring but also pair well with various designs, allowing for versatility in your nail art.
How long does nail art typically last?
The longevity of nail art depends on several factors, including the quality of the products used and your daily activities. Generally, with a good basecoat and topcoat, your nail art can last anywhere from five to seven days. To extend the life of your designs, avoid excessive exposure to water and consider wearing gloves during household chores.
Can I create nail art without professional tools?
Absolutely! While professional tools can enhance your designs, many nail art techniques can be achieved using household items. For example, you can use a bobby pin for dotting, tape for clean lines, and even a makeup sponge for ombre effects. With a little creativity, you can create beautiful nail art at home without needing specialized tools.
How can I remove nail art without damaging my nails?
To remove nail art effectively, start by soaking a cotton ball in acetone-based nail polish remover. Press the soaked cotton ball onto your nail and wrap it in aluminum foil for about 10 minutes. This allows the remover to penetrate the polish. Gently push off the polish with a wooden stick or nail tool. Be sure to moisturize your nails and cuticles afterward to prevent dryness.
What’s the best way to store nail polish for longevity?
To keep your nail polish in optimal condition, store it in a cool, dark place away from direct sunlight. Extreme temperatures can cause polish to thicken or separate. Make sure to keep the bottles tightly sealed and avoid shaking them, as this can introduce air bubbles. Regularly check for any changes in consistency or color, and discard any polish that has gone bad.